• Skip to primary navigation
  • Skip to main content
  • Skip to primary sidebar
  • Skip to footer

Mama Miss

  • Home
  • Contact
  • Shop
  • Free Printables
  • Recipes
  • About
  • Popular Posts

fancy fun: DIY Homemade Sparkling Beads

Monday, June 24, 2013 28 Comments


Yay it’s virtual summer camp counselor time!  I, along with 7 other fantastically creative bloggers (aka camp counselors) (Jenae from I Can Teach My Child, Lauren from Tutus & Tea Parties, Jodi from Meaningful Mama, Asia from Fun at Home with Kids, Megan from Coffee Cups and Crayons, Mari from Inspired by Familia and Vanessa from See Vanessa Craft), will take turns featuring a kid-friendly craft or activity each week on our own blogs.  So I’m sure you are wondering how this can get even MORE fun?!

Well, you can link up your own summer projects too, that will be seen by Disney/Babble (and may even be featured by them)!!!  Wahoo – Let the fun begin :)  (just look for the link at the bottom of this post to link up your summer projects too).


DIY Homemade Sparkling Beads #diy #glitter #kidscrafts #jewelry
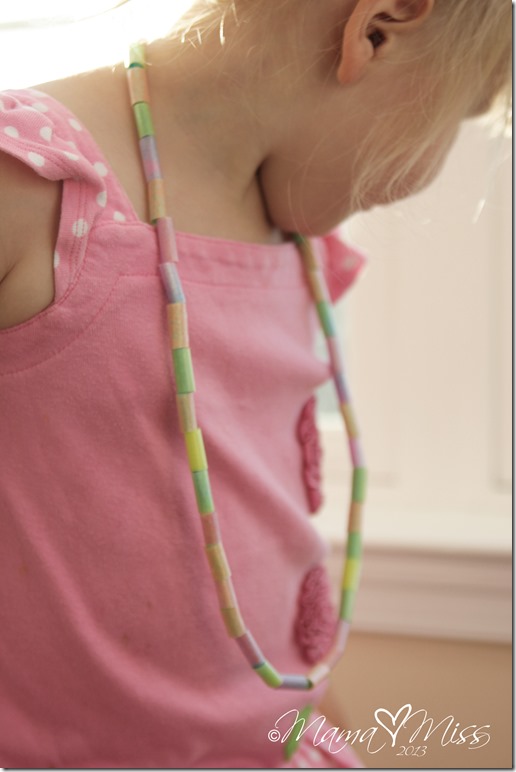
So here’s my summer fun I’m sharing with you today!  One of my favorite things as a kid were these AWESOME plastic bracelets I had – they were tubular and filled with glitter & water!  OMG – LOVED those bracelets – so much so, I wore them until the water dried out & all that was left was loose glitter!   ahhhh the 80’s & the ever-present existence of glitter ;)  Well, chalk it up to childhood memories for the direction this project took, because these beads vividly remind me of those bracelets!

So I ask you – would it be wrong for a thirty-something mama to sport these too?!  hehe – you just may see me at Target pushing my cart around sporting these new “ultra-trendy” beads ;) (cause’ I’m old & anything from my childhood is ultra-trendy these days – ummm neon!!)


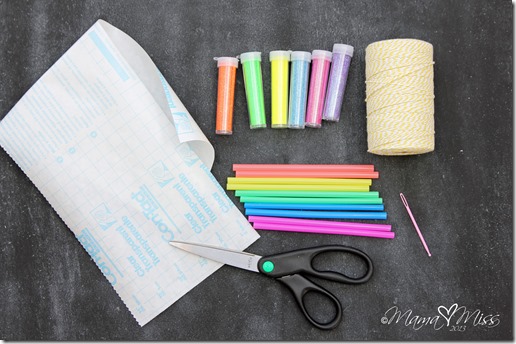
extra fine glitter in assorted colors

bakers twine or string

kids plastic needle

clear contact paper

10 plastic drinking straws (with bendy part cut off)

scissors


DIY Homemade Sparkling Beads #diy #glitter #kidscrafts #jewelry

DIY Homemade Sparkling Beads #diy #glitter #kidscrafts #jewelry


instructchalk


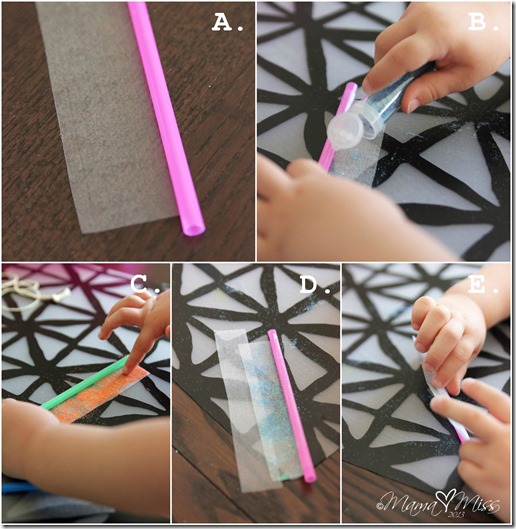
  • Start off by cutting 10 strips of contact paper that are 5-inches long x 1 1/2-inches wide and 10 strips that are 6-inches long x 1-inch wide.
  • Remove the paper backing and apply the sticky part of a  5”L x 1.5”W strip of contact paper to a straw.  Roll ever so slightly. (A)
  • Sprinkle and spread the glitter across the exposed sticky part. (B/C)
  • Remove the paper backing and attach the second piece (6”L x 1”W ) of contact paper to the first piece. (D)
  • Tightly roll both of the sticky contact strips with the straw. (E)
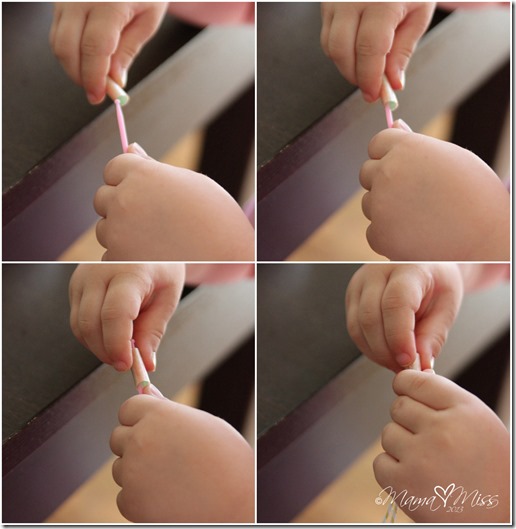
  • Cut the wrapped straw into small pieces. approximately 1/2-inch in length, creating a bead.
  • Repeat steps #3 to #6 for all 10 straws.
  • Cut off twine in desired length for necklace.  Thread needle.
  • Thread beads onto twine and knot ends together to complete necklace.


DIY Homemade Sparkling Beads #diy #glitter #kidscrafts #jewelry

DIY Homemade Sparkling Beads #diy #glitter #kidscrafts #jewelry


You can link up your own summer projects here!

♥

And you can check out all the other counselors projects here…

(I’ll link them up & check them off as they happen :)

June 10th – Mari from Inspired by Familia

June 17th – Vanessa from See Vanessa Craft

June 24th – Melissa from Mama Miss

July 1st – Lauren from Tutus & Tea Parties

July 8th – Megan from Coffee Cups and Crayons

July 15 – Jodi from Meaningful Mama

July 22 – Jenae from I Can Teach My Child

July 29 – Asia from Fun at Home with Kids

♥

Like what you see?!

You can connect with me on Pinterest|Facebook|Twitter|Google + too!

♥

© Mama Miss. All images & content are copyright protected.
Feel free to share one picture and linking directly to this post for download.
Please do not copy directions, ingredients, or pdf files for your own website.
Copying my post partially, or fully, is strictly prohibited.

♥

Please note that affiliate links are also provided throughout the post for your convenience – to allow direct access to the materials used.

(Visited 12,557 times, 1 visits today)

Related Posts

  • Piet Mondrian LEGO art | @mamamissblog #LEGO #DUPLO #modernartforkids #freeprintableart and learning: Piet Mondrian LEGO art
  • book & craft: Paper Plate Cherry Piebook & craft: Paper Plate Cherry Pie
  • Dewey The Cat Christmas OrnamentDewey The Cat Christmas Ornament
  • A Cat In The Hat Bracelet -with it’s unique quirkiness, it is a fun little craft to accompany the book! | @mamamissblog #drseuss ‪#‎vbcforkids‬Cat In The Hat Bracelet
  • DIY Rainbow Loom Printable Valentines | @mamamissblog #rainbowloom #loomcrafts #DIYvalentinesDIY Rainbow Loom Printable Valentines
  • Top 10 Tips For Shopping At A Kids Consignment Sale || @mamamissblogTop 10 Tips For Shopping At A Kids Consignment Sale
Tweet
Share
Pin16
Share7
23 Shares

crafts· create kiddo· fancy fun· guest post· KID CRAFTS· Summer

Stay updated!

Get all the latest goodness straight to your inbox!

Previous Post: « fave friday: Crushes Of The Week – Color Block DIY
Next Post: diy: Patriotic Washi Tape Wooden Bracelets »

Reader Interactions

Comments

  1. marie says

    Thursday, July 18, 2013 at 11:14 pm

    i love this!!!! cannot wait to try with my daughter!!

    Reply
    • mama♥miss says

      Friday, July 19, 2013 at 2:59 pm

      Thanks Marie!!!! You’ll have so much fun with them & feel free to post a picture to my FB wall too! :)

      Reply
  2. Amy @ Living Locurto says

    Thursday, July 18, 2013 at 9:28 am

    Love this idea with straws!! Thanks for sharing it for Living Creative Thursday. I featured you here: http://www.livinglocurto.com/2013/07/kids-craft-ideas/

    Reply
    • mama♥miss says

      Thursday, July 18, 2013 at 2:09 pm

      Thanks so much AMY!!!!!! You made my day – have fun in the sun – enjoy your trip (from those pics I already know you are :) xx m

      Reply
  3. Jackie says

    Saturday, July 13, 2013 at 12:12 am

    What a fun idea! I bet my kids would have fun with this craft, especially since it involves glitter. :)

    Reply
    • mama♥miss says

      Saturday, July 13, 2013 at 9:56 am

      V loved the glitter part too! Thanks Jackie!! :)

      Reply
  4. katepickle says

    Saturday, July 13, 2013 at 12:06 am

    oooh these are way cool!!!! And I don’t even like glitter!! LOL

    Reply
    • mama♥miss says

      Saturday, July 13, 2013 at 9:55 am

      Thanks Kate!! :)

      Reply
  5. Angela says

    Friday, July 5, 2013 at 9:47 am

    These are so clever! I’m doing these with my twin girls but I’m also going to remember these for my preschoolers next fall!

    Reply
    • mama♥miss says

      Monday, July 8, 2013 at 1:21 am

      awwww thanks Angela :) It was so much fun & V loved it! xx

      Reply
  6. Denise P. says

    Friday, July 5, 2013 at 7:20 am

    WHY DO YOU NEED TWO DIFFERENT SIZES OF CONTACT PAPER?

    Reply
    • mama♥miss says

      Monday, July 8, 2013 at 1:28 am

      Hi Denise! If you reference the picture collage, specifically D, you’ll see that the glitter is only sprinkled on the smaller of the two pieces of contact paper strips. The larger, second piece of contact paper, secures the first glitter covered strip to the straw. Without the second piece, nothing would be securing the first piece to the straw & without the first glittered piece, you would have no glitter. Hope that helps explain it better :) xx

      Reply
  7. shirin says

    Sunday, June 30, 2013 at 11:40 am

    that’s great..I used to made it when i was 7…but also i used it as a plume!!!

    Reply
    • mama♥miss says

      Monday, July 8, 2013 at 12:15 am

      Thanks Shirin! :) xx

      Reply
  8. Mary Catherine says

    Monday, June 24, 2013 at 12:56 pm

    I just love these! They are definitely going on my summer to-do list. The fact that there’s glitter involved makes it even better. :) Off to pin . . . thank you!

    Reply
    • mama♥miss says

      Tuesday, June 25, 2013 at 10:01 pm

      Thank you Mary Catherine :) And thanks for the pin love!

      Reply

Trackbacks

  1. 18 Ways for Kids to Make Beads - Buggy and Buddy says:
    Wednesday, September 2, 2015 at 7:30 pm

    […] DIY Homemade Sparkling Beads from Mama Miss […]

    Reply
  2. 4 creatives manualitats amb canyes de plàstic de colors | tot nens says:
    Tuesday, August 11, 2015 at 12:28 am

    […] veure tutorial […]

    Reply
  3. 95 Summer Break Ideas and Boredom Busters - The Cards We Drew says:
    Tuesday, May 26, 2015 at 8:39 pm

    […] DIY Sparkling Beads from Mama Miss […]

    Reply
  4. 15 Favorite Art Activities for Children says:
    Friday, April 3, 2015 at 1:32 pm

    […] Homemade Sparkling Beads […]

    Reply
  5. Crafts for Girls - FSPDT says:
    Wednesday, January 14, 2015 at 1:02 am

    […] DIY Sparkly Beads on Mama Miss […]

    Reply
  6. Teach Kids to Sparkle with Fun Activities #SparkleWithDASANI says:
    Saturday, July 12, 2014 at 11:56 am

    […] DIY Sparkling Beads Craft (Mama Miss) […]

    Reply
  7. Craft for Kids: Tin Can Lanterns says:
    Friday, May 2, 2014 at 9:43 pm

    […] DIY Homemade Sparkling Beads from Mama Miss […]

    Reply
  8. 40 Awesome Crafts for Kids! » Little Inspiration says:
    Sunday, September 22, 2013 at 2:50 am

    […] 4. Homemade Sparkling Beads […]

    Reply
  9. Fabric and Paper Bracelet - Mama Miss says:
    Thursday, August 22, 2013 at 8:05 am

    […] craft with V soon, I came upon my collection of paper straws.  And then I thought of the recent glitter beads we made using plastic straws & wondered if we could do something with paper straws too?!  I thought […]

    Reply
  10. Make a Rain Stick - I Can Teach My Child! says:
    Tuesday, July 30, 2013 at 9:55 am

    […] DIY Homemade Sparkling Beads by Mama Miss […]

    Reply
  11. Summer Camp at Home Craft and Kids Activities says:
    Tuesday, July 23, 2013 at 4:23 pm

    […] Play Water Obstacle Course – Meaningfulmama.com Craft for Kids: Tin Can Lanterns DIY Homemade Sparkling Beads – Mama Miss DIY Recycled Box Playhouse Tent | Inspired by FamiliaInspired by Familia I Can Teach My Child! […]

    Reply
  12. Water Obstacle Course - Meaningfulmama.com says:
    Tuesday, July 16, 2013 at 1:18 am

    […] DIY Homemade Sparkling Beads by Mama Miss […]

    Reply

Leave a Reply Cancel reply

Your email address will not be published. Required fields are marked *

This site uses Akismet to reduce spam. Learn how your comment data is processed.

Primary Sidebar

About me

Gratitude For Middle Schoolers

Gratitude For Early Elementary

Subscribe to Mama Miss Happenings!

Affiliates and Sponsors

What I’m Pinning

Copyright & License

Protected by Copyscape Plagiarism Checker
Creative Commons License
This work by Mama Miss is licensed under a Creative Commons Attribution-NonCommercial-NoDerivs 3.0 Unported License.
© Mama Miss, 2012-2020. Unauthorized use and/or duplication of this material without express and written permission from this blog’s author and/or owner is strictly prohibited. One picture with a link back may be used provided that full and clear credit is given to Mama Miss and with appropriate and specific direction to the original content. Copying a post partially, or fully, is strictly prohibited. * YOU MAY NOT use any photo from mamamiss.com without agreeing to my copyright terms. Please do not copy directions, ingredients, or pdf files for your own website. *YOU MAY NOT edit my photos by cropping out my logo - such is a copyright violation & legal action will be pursued.

Find me here

mamamiss foodgawker gallery   mamamiss craftgawker gallery


 baby book

My Instagram

This error message is only visible to WordPress admins

Error: No connected account.

Please go to the Instagram Feed settings page to connect an account.

Footer

Categories

Archives

Search

Return to top of page    Disclaimer