• Skip to primary navigation
  • Skip to main content
  • Skip to primary sidebar
  • Skip to footer

Mama Miss

  • Home
  • Contact
  • Shop
  • Free Printables
  • Recipes
  • About
  • Popular Posts

Kool-Aid Dyed Rice

Tuesday, May 8, 2012 14 Comments

So, Kool-Aid Dyed Rice. Here are some really GENIUS reasons why I dye with kool-aid vs. food coloring in creating sensory bins for the kiddos.
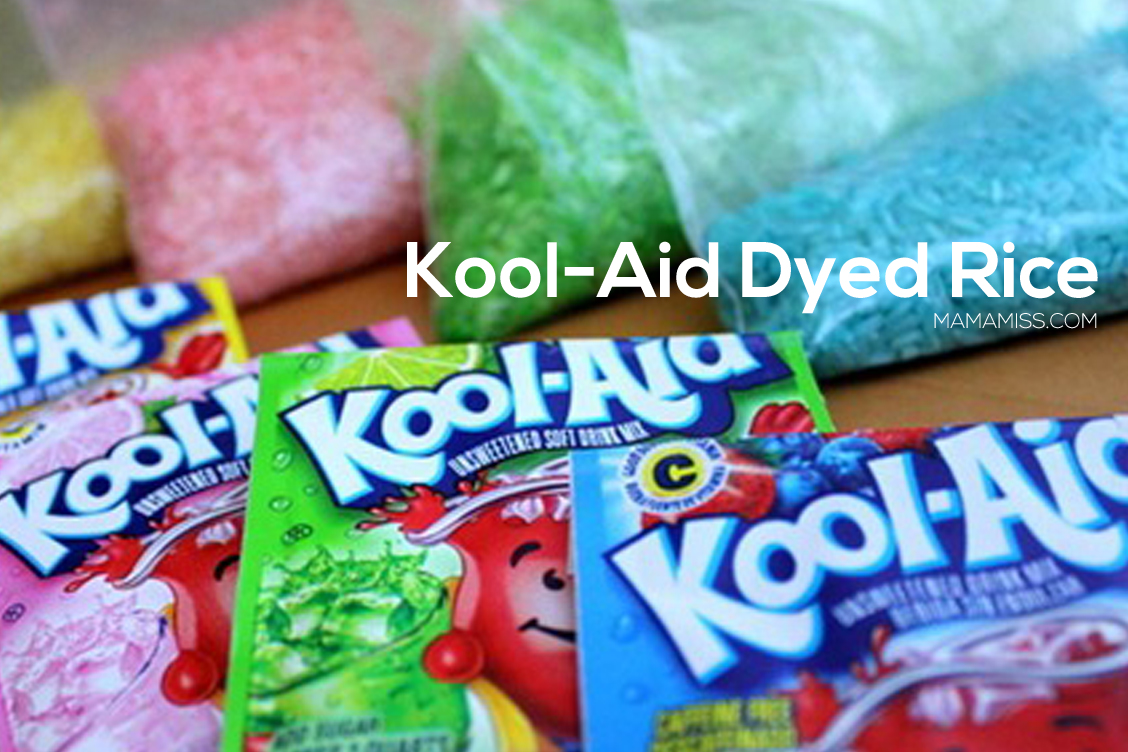
Kool-Aid dyed rice smells so yummy - it's perfect base for your kiddo sensory bin! Find the instructions on @mamamissblog

Why Kool-Aid Dyed?

  • kool-aid doesn’t dye your hands after it dries like the food coloring does
  • it smells good, so it covers the rubbing alcohol smell, which even after the rice dries can still be overwhelming
  • the colors are gorgeous, much brighter than food coloring would make

So, have I convinced ya?  are you a kool-aid convert? (side note: when purchasing kool-aid, to determine the color that it will dye to, look at the picture on the front, of the liquid in the cup that mr. kool-aid man is holding – don’t be fooled by the color of the envelope – the color in the cup is the color it will dye to)

MATERIALS

  • Gallon-Size Freezer bags (use the Freezer ones, they are thicker & easier to shake the mixture with)
  • Tray for drying overnight

For each color/freezer bag of rice, you will need:


  • 1 cup of rice (I buy a huge 5lb or 10lb bag at Walmart very cheap just for this purpose)
  • 1 teaspoon rubbing alcohol
  • 1/2 teaspoon kool-aid (weirdly packets can vary from color, to how much is in each envelope but generally each envelope contains 1 teaspoon)

INSTRUCTIONS

  1. Open your freezer bag nice & wide and stand it up.
  2. Firstly, add the 1 cup of rice.
  3. Secondly, add the 1/2 teaspoon kool-aid.
  4. Thirdly, add the 1 teaspoon of rubbing alcohol.
  5. Next, seal it shut (make sure it is shut…because wet kool-aided rice is NOT a fun experience to clean up).
  6. Now it’s time to shake, shake, shake it up (this can be a fun part in the process for the kids to do too).
  7. Then, let it sit for a good 15 minutes.
  8. Next, pour it out onto a tray and get it as flat as it will go so that you can dry it overnight (or for at least 6-8 hours). I usually make little tin foil boats in the tray to separate the colors & it looks soooo pretty too!
  9. When it is dry, it will be all clumped together. Smoosh (this is the technical word) it down to separate the rice grains and you are good to go (smooshing is also fun for the kiddos to do too, to get them involved).
  10. Finally, separate the colors in the sensory bin to your liking.

Have fun with your new sensory bin!!!! :)

♥

Like what you see?!

You can connect with me on:

Pinterest || Facebook || Twitter

And don’t miss any updates, get new posts right away – sign up here…

♥

© Mama Miss. All images and content are copyright protected.
Feel free to share ONE picture and link directly to this post for download.
Please do not copy directions, ingredients, or pdf files for your own website or Facebook page; visuals or words.
Copying my post partially, or fully, is strictly prohibited.

All work by Mama Miss is licensed under Creative Commons Attribution-NonCommercial-NoDerivs 3.0 Unported License.

(Visited 19,779 times, 1 visits today)

Related Posts

  • Piet Mondrian LEGO art | @mamamissblog #LEGO #DUPLO #modernartforkids #freeprintableart and learning: Piet Mondrian LEGO art
  • diy: Daily Calendar Journal
  • Pretend Play Inspired By Tulips #freeprintable #pretendplay #tulips https://www.mamamiss.com ©2013learning monkeys: Pretend Play Inspired By Tulips
  • Lorax Mustache & Truffula Tree https://www.mamamiss.com ©2013fun eats: {Dr. Seuss Inspired} Lorax Mustache & Truffula Tree
  • Peanut Butter Cup Chocolate Shake | Mama Miss #healthy #shake #chocolate #peanutbutterfun eats: Peanut Butter Cup Chocolate Shake
  • Bejeweled DIY Statement Ring - create your very own bling! | @mamamissblogBejeweled DIY Statement Ring
Tweet
Share
Pin42
Share
42 Shares

create kiddo· KID ACTIVITIES· KID CRAFTS· sensory

Stay updated!

Get all the latest goodness straight to your inbox!

Next Post: Spring Sensory Bin »

Reader Interactions

Comments

  1. Ivy says

    Tuesday, May 21, 2013 at 11:44 pm

    Can I dry the rice in the refrigerator or with a hair blow dryer to make it dry faster?

    Reply
    • mama♥miss says

      Sunday, May 26, 2013 at 10:31 am

      I don’t see why not Ivy – it would probably work with a hair dryer on low. :)

      Reply
  2. My Wee Friends says

    Thursday, December 27, 2012 at 4:16 pm

    Thanks for sharing. I’m going to use this for my preschool!

    Reply
    • mamamissblog says

      Saturday, December 29, 2012 at 3:17 pm

      Thank you!!! So happy you are using it – they will love it :) And it smells sooooo very good too!!! Thanks for stopping by & leaving me some comment love too :) xx ♥ m

      Reply
      • Dawn says

        Friday, October 31, 2014 at 8:47 am

        Can the kool-aid rice be used in a hot and cold rice bag? And would the bag smell like the different flavors? Just a thought!

      • Melissa Klinker says

        Saturday, November 22, 2014 at 6:28 am

        ooooooooh LOVE that idea Dawn – BRILLIANT!! xx

Trackbacks

  1. Preschool Playdate: Ireland | Sweet Pea Families says:
    Friday, March 25, 2016 at 11:46 am

    […] Bin We made green rice via the recipe on the Mama Miss blog. It is so easy to do – it literally takes five minutes to make. The only caveat is that you […]

    Reply
  2. Pasta and Puppies Sensory Bin » The Pleasantest Thing says:
    Friday, February 21, 2014 at 10:44 pm

    […] shares some fun with coloring cooked spaghetti. Mama Miss has tutorials on coloring both pasta and rice with Kool-Aid Teach Preschool has a post that explains coloring rice with Kool-Aid, food coloring, […]

    Reply
  3. St. Patrick’s Sensory Bin & Kool-Aid Dyed Rice | Hazelfly says:
    Monday, January 27, 2014 at 2:23 am

    […] would wear Cherry Kool-Aid perfume if they made it. Anyway, Melissa has a great tutorial on how to dye rice with Kool-Aid! Hop on over to read about it in more detail and why she prefers it to food coloring. I followed […]

    Reply
  4. 50 Fun Ways to Play with Rice | Mama OTMama OT says:
    Sunday, September 1, 2013 at 3:03 am

    […] 7. Make colored rice using Kool-Aid & rubbing alcohol: Mama Miss […]

    Reply
  5. Scented Watermelon Sensory Rice says:
    Wednesday, July 17, 2013 at 11:52 pm

    […] I have dyed rice for sensory bins before, I had never tried adding a scent. Luckily, I found this awesome tutorial at Mama Miss all about using Kool-aid to dye rice. This method was really easy and yielded […]

    Reply
  6. St. Patrick’s Sensory Bin & Kool-Aid Dyed Rice says:
    Thursday, March 7, 2013 at 8:04 am

    […] would wear Cherry Kool-Aid perfume if they made it. Anyway, Melissa has a great tutorial on how to dye rice with Kool-Aid! Hop on over to read about it in more detail and why she prefers it to food coloring. I followed […]

    Reply
  7. How to Color Rice - In Lieu of Preschool says:
    Wednesday, February 27, 2013 at 9:42 pm

    […] directions, see this tutorial from Mama Miss.  We used it as our guide.  As a first time rice dyer, I enjoyed reading her post […]

    Reply
  8. Painting with Spices | Lasso the Moon says:
    Friday, August 17, 2012 at 6:57 am

    […] mama♥miss :: Kool-aid Dyed Rice […]

    Reply

Leave a Reply Cancel reply

Your email address will not be published. Required fields are marked *

This site uses Akismet to reduce spam. Learn how your comment data is processed.

Primary Sidebar

About me

Gratitude For Middle Schoolers

Gratitude For Early Elementary

Subscribe to Mama Miss Happenings!

Affiliates and Sponsors

What I’m Pinning

Copyright & License

Protected by Copyscape Plagiarism Checker
Creative Commons License
This work by Mama Miss is licensed under a Creative Commons Attribution-NonCommercial-NoDerivs 3.0 Unported License.
© Mama Miss, 2012-2020. Unauthorized use and/or duplication of this material without express and written permission from this blog’s author and/or owner is strictly prohibited. One picture with a link back may be used provided that full and clear credit is given to Mama Miss and with appropriate and specific direction to the original content. Copying a post partially, or fully, is strictly prohibited. * YOU MAY NOT use any photo from mamamiss.com without agreeing to my copyright terms. Please do not copy directions, ingredients, or pdf files for your own website. *YOU MAY NOT edit my photos by cropping out my logo - such is a copyright violation & legal action will be pursued.

Find me here

mamamiss foodgawker gallery   mamamiss craftgawker gallery


 baby book

My Instagram

This error message is only visible to WordPress admins

Error: No connected account.

Please go to the Instagram Feed settings page to connect an account.

Footer

Categories

Archives

Search

Return to top of page    Disclaimer