“This post is part of a social shopper marketing insight campaign with Pollinate Media Group™ and Cottonelle, but all my opinions are my own. #pmedia #CottonelleTarget http://cmp.ly/3/8vNxcO.”

Hey there! Are you looking for a super cute, last minute, on a budget, DIY costume for your little miss?!
I thought so! ;)
Miss V is currently obsessed with all things girly, fairy, and flowery. So, inspired by the idea of creating a costume out of flowers, or what became a “flower fairy” in this case, I created this for Miss V.
Annnnd, you will never guess what the MAIN component of this Flower Fairy Costume is?!
Crepe paper?! Nah!
Fabric?! Nope!
Cottonelle Triple Roll Toilet Paper

what – what?!
oh yeah – who knew Toilet Paper could be so fun?! Cottonelle Triple Roll Toilet Paper is so soft, I mean soooooo soft that V kept petting her wand during our photo shoot. It honestly feels like silk & it’s super thick so it was perfect for this project. I just popped into ol’ Target & grabbed a pack and got to craftin’!
Oh & before I forget to tell you – how COOL is this ?! Cottonelle is sharing this freebie coupon with you to create your own Halloween inspired fun too!
So, while supplies last, just pop into Target, and buy a Cottonelle Triple Roll 12 pack or larger – and you’ll get a FREE box of Kleenex with this coupon (get your coupon here). Free is ALWAYS good!
I simply LOVE the way this turned out! You know sometimes I get these wild & crazy creative ideas in my head and when I go to bring them to life, well, they don’t always end up looking how I saw it in my head. But this Flower Fairy Costume SURPASSED my wildest expectations!! Creating with TP is so incredibly fun (ha-ha I felt like I was on Project Runway, lol, do you think Heidi & Tim would approve?!).
So, it’s a super easy tutorial to make this fun costume – I had EVERYTHING already lying around the house.
Wanna make one too?! You can!!! Just scroll down for the materials & instructions.


Wand
- 1 – Wood Round Bead, 1-inch
- 1 – Cookie Stick, 8-Inch
- 3-inch circle template +
- pen +
- scissors +
- Cottonelle Triple Roll +
- hot glue sticks & glue gun +
+ also used in the other steps
Headband
- cardboard 3-inch circle (I used the inside of a masking tape roll to make it)
- 2 – cardboard 1-inch circles
- green headband
- + (3-inch circle template, pen, scissors, Cottonelle Triple Roll, hot glue sticks & glue gun)
Skirt
- simple white layered tutu
- + (3-inch circle template, pen, scissors, Cottonelle Triple Roll, hot glue sticks & glue gun)
Shirt
- 1- white l/s shirt
- assorted green felt
- sewing pins
- petal & stem template (see below)
- white thread
- sewing machine (or needle)

Wand
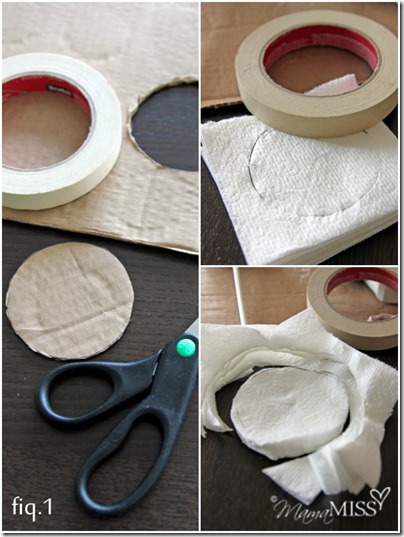
- Roll out a long length of TP and then fold the squares accordion style.
- Place the circle template over the folded squares & trace the circle shape. (fiq.1)
- Cut out circle layers; Separate circles. (fiq.1)
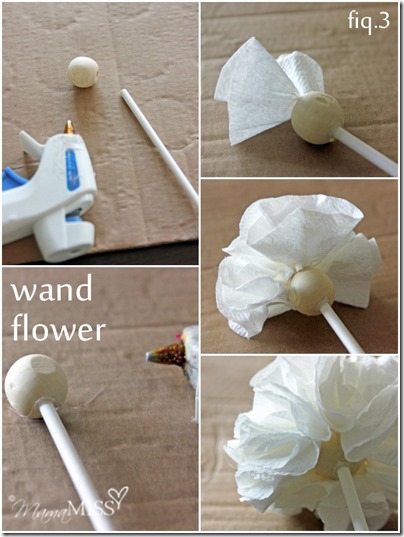
- Glue the cookie stick into the wooden bead creating a wand. (fiq.3)
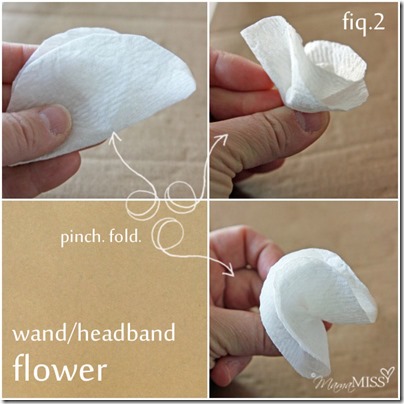
- Create the flowers (fiq.2): fold a circle in half and then pinch & fold the bottom.
- Starting at the top and moving around and down, glue the flowers next to each other onto the wooden bead, filling the entire bead. (fiq.3)
Headband
- Roll out a long length of TP and then fold the squares accordion style.
- Place the circle template over the folded squares & trace the circle shape. (fiq.1)
- Cut out circle layers; Separate circles. (fiq.1)
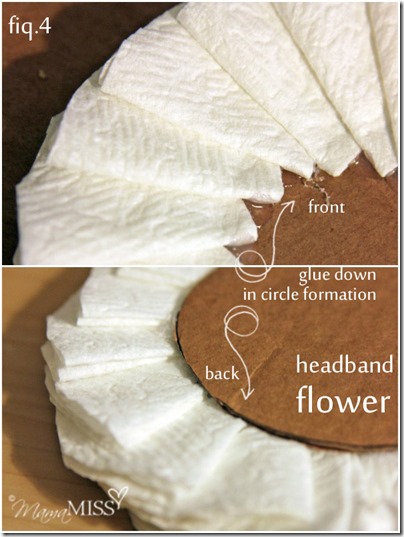
- Following the same flower folding technique as above (fiq.2) glue the flowers down flat around the outer edge of the cardboard circle. (fiq.4)
- Once the flatter outer edge is created, began gluing more fluffier flowers down like the wand was created, covering the entire circle.
- Glue onto headband, to the side and off center.
- Repeat steps for additional two flowers using the smaller 1-inch cardboard circles.
- Glue additional two flowers to headband on each side of large flower.
Skirt
- Roll out a long length of TP and then fold the squares accordion style.
- Place the circle template over the folded squares & trace the circle shape. (fiq.1)
- Cut out circle layers; Separate circles. (fiq.1)
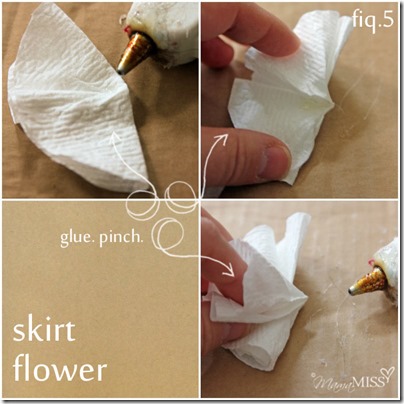
- Create 3 flowers using the same technique as in the wand & headband.
- Pinch all three together and glue to secure, thus creating a fluffier triple flower. (fiq. 5)
The flowers in the wand & headband will stay compressed together as single flowers and without the glue between them because they are all together in a tight space, holding each other in. For the skirt, the flowers are attached in separate places on the skirt, so the three flowers combined and then glued together in the center forms a more full and complete flower.
- Attach the “triple flowers” with the hot glue gun. Place them randomly, but symmetrically, on the tulle skirt creating a pattern.
Shirt
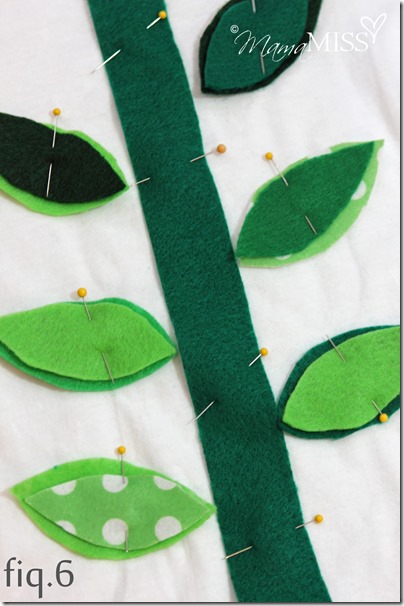
- Cut out six large & six small petal shapes in assorted green felt, feel free to use the templates I created. (download them here)
- Cut out a long green felt shape, in a darker green color for the stem – 12” L x 1 1/4” W
- Attach the petals and stem to the middle of the shirt as shown with sewing pins. (fiq.6)
- Either sew a straight running stitch through each piece (I did three for the stem) using your sewing machine, or sew each piece down by making a simple running stitch by hand.
♥♥♥


♥
Like what you see?!
You can connect with me on:
Pinterest|Facebook|Twitter|Google + too!
♥
© Mama Miss. All images & content are copyright protected.
Feel free to share one picture and linking directly to this post for download.
Please do not copy directions, ingredients, or pdf files for your own website.
Copying my post partially, or fully, is strictly prohibited.
All work by Mama Miss is licensed under Creative Commons Attribution-NonCommercial-NoDerivs 3.0 Unported License.
♥♥♥
Please note that affiliate links are also provided throughout the post for your convenience – to allow direct access to the products suggested.


What a fabulous idea! Really cute!!!
Thanks Mom! :) xx
I cannot believe that those are made out of TP, they are so pretty!!!
Thanks!! I know right Kaysi – who would of thought – TP!! This post was soooo fun – thanks for stopping by :)
So adorable!! I love her costume!
Thanks Jennifer!! :)
SO pretty! The headband is my favorite! Great tutorial! Thanks for sharing!
Thanks Kristine :) xx
That is so precious!!
Thanks Sarah – LOVED you cloud costume – so adorbs!
She’s adorable! And I can’t believe that’s tissue paper!!!
awww thanks Mari! Me either – can’t believe it turned out so cute!!! xx