“This shop is part of a social shopper marketing insight campaign with Pollinate Media Group® and Scott Brand, but all my opinions are my own. #pmedia #Scottvalue http://my-disclosur.es/OBsstV”
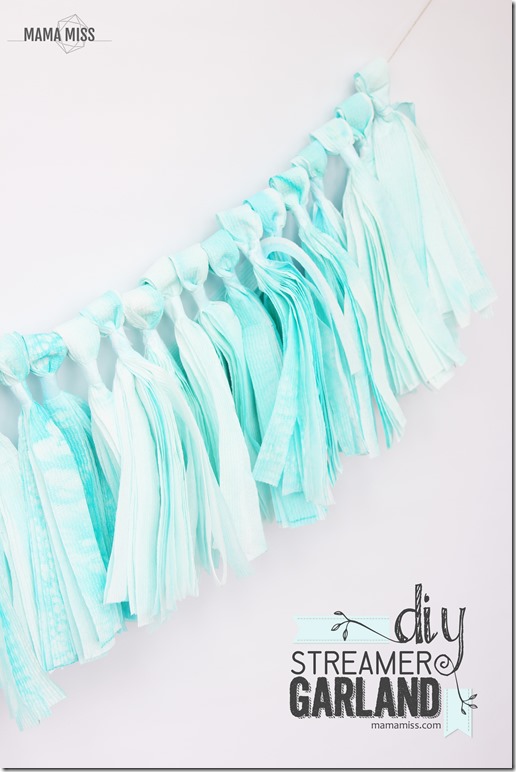
So, do you ever have one of those genius a-ha moments?!
When a roll of paper towels screams dip-dye, watercolor streamers?! No?! ha-ha welcome to my brain – it sees extraordinary things in ordinary things – like ombré in lettuce, or hearts in strawberries, or peace signs in tomatoes (food especially speaks to me ;) …. or… the PERFECT lines in SCOTT® paper towels for STREAMERS!!! awww yeah!! Streamers made out of paper towels – aka a DIY Streamer Garland!!
Now, one of the MOST important thing for these streamers are the paper towels, you need THICK, a durable paper towel to hold up through the process I’m about to walk you through.
And, you need LINES. Lines?! Well most paper towels have a lovely floral print imprinted or printed in ink on them – those won’t work for these to replicate streamers. Streamers have lines in them that’s why these SCOTT® paper towels are PERFECT – the lines!! They look like streamers – no one would guess that they were paper towels!!!

So, what can you use streamers for?! Well, just about anything!! Decoration, parties, or photo shoots to start. Which is what I wanted them for.
Little T is turning the big THREE here soon & I wanted to do a photo shoot for my little guy to celebrate his upcoming birthday. I wanted something not too “photo prop-y” but whimsical – enter in my DIY Streamer Garland idea!!
This DIY Streamer Garland is so unbelievably easy to make – you really should just get started now ;) But, before you head to the store just yet, be sure to check out Kmart’s Shop Your Way Rewards for great coupon offers on Scott Tissue products this week! I’ll include the link for you here. So, go grab some SCOTT® paper towels and lets get started with this fun DIY!!!
Here is what you’ll need to make this DIY Streamer Garland:
- SCOTT® paper towels (1 roll for every 32 streamers) (got mine at Kmart)
- food coloring (I used neon blue with some drops of yellow to make it teal)
- large metal bowl (use metal so the color won’t stain)
- metal tray (to set roll onto while dip-dying)
- large tarp or mat (for drying)
- twine (to create the garland)
- scissors
- tape
- ruler
- sheet of 8.5×11 copy paper
- optional: rubber gloves (to prevent dyed hands)

Here’s how to make this fabulous DIY Streamer Garland (now, don’t be daunted by the steps – I just wanted to be thorough in the instructions, but once you do one, you’ll fly through the other 31, I promise!)
- Fill your large bowl about 3/4 full of water, then add food coloring – adjust accordingly to the color vibrancy & shade you prefer.
- Dip your entire paper towel into bowl, allowing it to soak up the color for a couple of minutes before you pull it out.
- Pull the towel roll out of the bowl and let it drip out the excess liquid.
- Flip to the other side of the roll and repeat steps 2 & 3 to desired hues.

- Squeeze out excess liquid from paper towel.

- Lay down your tarp or large mat.
- On the tarp, unroll your entire paper towel roll, gently & slowly – in 12 square length strips – you will have 8 of these (12 square length strips) for one roll. In basic terms – count out 12 squares, rip at perforation & then start next 12 squares.
- Let dry fully. I laid mine out on the floor, under a ceiling fan, and it took about 2 hours to fully dry. Without a overhead fan you may need to let them sit overnight to fully dry.

- Once dry, split/rip on perforation your 12 squares (of 8) in half, to six squares. Once done, you’ll have 16, 6 squared sheets.
- Fold (don’t rip) the six sheets in half (along the perforated line), so you’ll have three squares on each side of the fold.

- Using your ruler, create your guide by marking off at approximately every 2 3/16″ spots (try to even space them) along the 11” edge of copy paper – you’ll have 4 marks (& 5 spaces) along the 11”.
- Line up your guide along the folded edge of each sheet and transfer your marks from the guide to the folded edge of paper towel.
- Using the marks, cut through the layers to the end of the doubled 3 squares, creating five strips (still folded).

- Rip/tear at folded perforation for each strip.
- You will now have 10 strips total.

- Group 5 strips together and cut in half again. Do this for both sets of 5 strips.
- You will now have 20 strips total.

- Pile 10 strips and fold loosely in half, lining up the ends to make even.
- Loosely twist, creating a loop at the top, big enough to thread twine through.
- Tightly grasp at twisting point and wrap tape around to secure.
- Loosen loop by putting your finger through loop to open up.
- REPEAT for remaining 31 streamers.

- Once streamers are created, thread them on the twine.

Wahoo!! Your DIY Streamer Garland is complete!
Hang it up. Snap some pics. Decorate for a party.
Enjoy and admire your beautiful new dip-dye, watercolor DIY project (made out of paper towels!!)
Plus, when big sis gets home & the photo shoot is done, there is always time for an impromptu dance party!!
Crank up that music and DANCE!

Oh & don’t forget to check out to check out Kmart’s Shop Your Way Rewards for those offers on Scott Tissue products this week before you head to the store!
You can also connect with SCOTT® brand products on their Facebook page too.


♥
Like what you see?!
You can connect with me on:
Pinterest || Facebook || Twitter || Google +
♥
© Mama Miss. All images & content are copyright protected.
Feel free to share ONE picture and linking directly to this post for download.
Please do not copy directions, ingredients, or pdf files for your own website or Facebook page, visuals or words.
Copying my post partially, or fully, is strictly prohibited.
All work by Mama Miss is licensed under Creative Commons Attribution-NonCommercial-NoDerivs 3.0 Unported License.
♥♥♥


WOW! Loved this tutorial, absolutely creative, and opened our eyes to more possibilities with paper towels!
Thanks for sharing!
Team Craftwell
http://blog.craftwellusa.com
Thanks!! xx
You are crazy creative! Super!
Awwww shucks – thank you Birute! :) xx
That is brilliant! I can’t believe these lovely streamers were made from paper towels!
Thank you Emma – totally – amazing what you can make with paper towels!!! xx
I love the natural ombre look you get from dipping the entire roll like that! So creative-and my mind definitely does NOT work that way :)
Thank you Nicole! xx
This is just adorable, I love everything about this setup! I’m always taking studio shoots of my boys and something like this for the background would look wonderful! I’ve been wanting to make one with material, but now that I see you did this with paper towels I have to try it!! Your pictures look great as well the globe is a great touch.
awwww thank you Courtney – appreciate your kind words! xx
This is such an awesome and creative idea!
Thank you Arena! xx
What an awesome idea! So adorable too. I love the bright color you choose. I love that this is under “genius mama moment”. I think I will look around that section today, haha. I need more of those, lol ;)
hehe don’t we all Ginger – don’t we all! Thanks for popping by mama!! xx