
V and I made colorful matching mama & kiddo bracelets OUT OF POPSICLE STICKS! What’s that you say – popsicle sticks?! Oh yeah! I saw these beautiful colorful bracelets created with markers here. And I thought…hmmm washi tape! Granted these take a couple of days to make, but once the sticks are formed all that’s left is decorating them – oh and wearing them of course :) A simple and easy craft for some mama-kiddo bonding time!

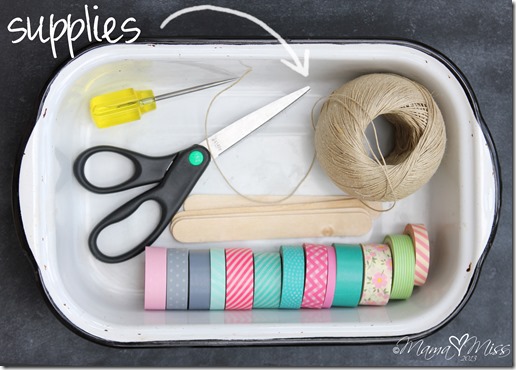
- tall glass of water (for soaking)
- mug (for molding)
- jumbo sized popsicle/craft sticks
- awl or piercing tool
- hemp beading cord #20
- scissors
- assorted colors washi tape

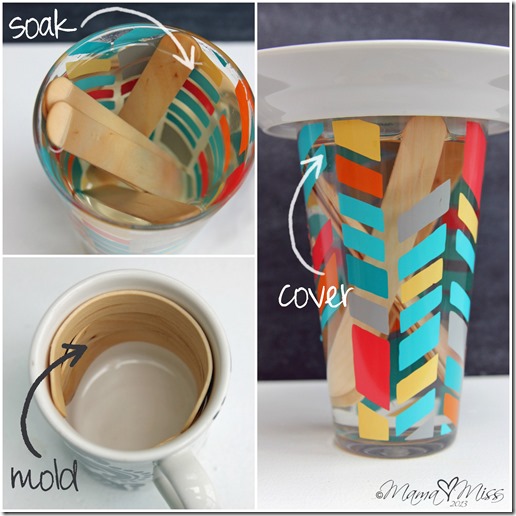
- Start off by soaking the popsicle sticks in water, immersed fully, for at least TWO DAYS, until they are pliable enough to mold. I added a ceramic plate on top to keep them down, because they will float to the top.
- After a couple of days soaking, pull them out of the water and begin carefully molding them into a bracelet shape. You may want to do this process fast, but don’t. Bend them slowly, because they will break – I broke THREE!
- Place the molded sticks in your mug (one that is the right width to fit your wrist).
- Next, is more waiting. One day is sufficient drying time if the mug is placed in the sun, otherwise it must dry for two days to mold fully.
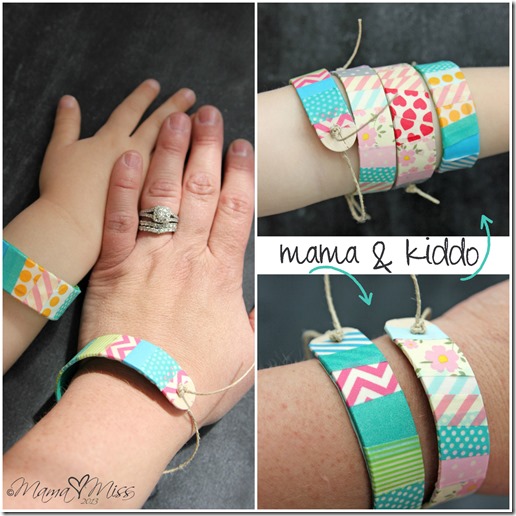
- Now, the FUN part – decorating your bracelets!
- Wrap the washi tape around the bracelet using approximately two inch strips to go all the way around, leaving room at the end.
- What helped V a lot was ripping off several strips of washi tape at a time, and placing them on the table for her to add to her bracelet in the order she wanted.
- While V worked on her two bracelets, I made two bracelets of my own :)

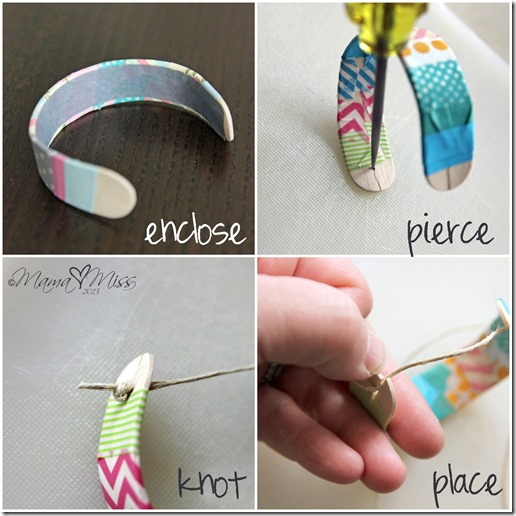
- Once finished wrapping, cut off one long strip covering up and enclosing the loose closures on the inner band, making a seamless inside.
- Using your awl, pierce holes into both ends, it’s okay that it cracks, this makes it easier to pull the cord through.
- Pull the cord through the slot and make a knot on the outside securing the cord.
And there you have it, some pretty little DIY mama & kiddo bracelets!
♥


Like what you see?!
You can connect with me on Pinterest|Facebook|Twitter|Google + too!
♥
© Mama Miss. All images & content are copyright protected.
Feel free to share one picture and linking directly to this post for download.
Please do not copy directions, ingredients, or pdf files for your own website.
Copying my post partially, or fully, is strictly prohibited.
♥♥♥
Looking for more things to make with Washi Tape?!
Well, I got ya covered with a few!
Washi Tape Cupcake Art

DIY Valentine Treat Bag

Patriotic Washi Tape Wooden Bracelets

And I OF COURSE have a Pinboard on Pinterest dedicated to my Washi Tape love!
Titled very appropriately: “washi tape LOVE”!
Follow me there & find some cool Washi Tape Crafts I’ve picked!
♥
Please note that affiliate links are also provided throughout the post for your convenience – to allow direct access to the products used.

Love this bracelets Idea with tape, so adorable and kind of unique think – a wooden band!!!
Thanks for sharing this with us.
I love the look of these. This might be a silly question but what is Washi tape? I’m in the uk. Maybe I know it by another name?
Hey AJ!! Washi Tape is Japanese paper tape – here is a way better, more detailed explanation: https://www.cutetape.com/creative/blog/2012/6/what-is-washi-tape
What’s the difference between patriotic washi type wooden bracelet and washi type wooden bracket ?
Hi Tiffany! The steps are the same, they were just for two different occasions. :) xo
We used boiling water, and it only needed a few hours to work. We had to keep refreshing the water to keep it hot.
Awesome idea Erin – I’ll keep that in mind for next time! xx
Cool idea! I tried to put color the water to see if it could change the popsicle stick’s color. Still waiting for results.
Awesome added hack Lina! Would love to know how it turned out!!! xx
Hi, love this idea ~ think I’ll try it in our summer camp. To clarify, it looks as though one side where the string goes has a slit in it. Or do you make a hole on each end to tie the knot. Thank you !
Hi Kat! I made a hole in each end for the string to slit through. You could also use a dremel or smaller drill & just drill a hole that way – someone also suggested making the hole while it was wet & it might not crack. I kinda liked the crack because it made it easier for my little one to thread it through :) Good luck & have a fun summer camp!! xx
Love this idea too. I think this could be a really different and easy Mother’s Day project for my first graders. One more question, the pics look as though you have to slide the bracelets over your hand or do you keep slipping the knot out of the crack in thebracelet to get it on and off?
Either way would work Sharon! They easily slide on & off without removing the knot :) xx
These bracelets are so pretty, I’ve seen them all over the place but I had no idea they were yours!! Your did such an amazing job on them. And the pictures are fantastic!
awww thanks Courtney!!! xx
Love this project! Just wanted to let you know that I featured a photo of your bracelets in my weekly round-up. It’s clearly attributed to you and linked back with photo and text links. Happy Sunday!
http://muslinandmerlot.blogspot.com/2014/04/sunday-funday-features-11.html
Thank you Heidi – super sweet of you!! :) xx
When you said to let them soak for a couple of days, did you literally mean 2 days? We did 2 and then totally don’t feel like they’ll bend without snapping.
Yep, at least two days I would say – if it’s not bendable after two days I would soak them for longer :) Thanks Wendy! xx
Your bracelets are beautiful.
Thank you Maria! xx
Hi, love this idea. Was it difficult to pierce the wooden sticks when they were dry – did they crack? Just wondered if you’d tried piercing them when they were wet and if this worked?
Thanks,
Ro
I didn’t try piercing them wet first – I’ll have to try that next time :) I was actually kinda bummed that they cracked at first but then it provided the perfect little entry for the string for my daughter & it ended up being a perfect mistake! :) xx
You Blog is so cute! There are a lot of great ideas about crafting!
I cited this project here:
http://lunadeicreativi.com/blog/wahi-tape-tra-i-prodotti-ikea-ole-e-8-tutorial/
Thank you for sharing your ideas!
Kisses,
Lory
awww thanks Lory! And thanks for featuring me – I appreciate your kind words :) xx
Hi there!
Where did you get your washi tapes? I like the one w pink Sakura flowers featured in your bracelet!
Hi Graclyn! I get them everywhere I can find them :) The one you are referring too I got at Michaels craft store – it was part of the Recollections series (not sure if it’s available anymore). Here’s what the packages look like: (http://bit.ly/16MB1qx). Also, I just checked on Amazon & this one is REALLY close too(http://amzn.to/17YxU9X). Hope that helps!! xx
there are so so pretty! I put a link to your blog on mine for 8 DIY bracelet projects!!! http://schulmanart.blogspot.com/2013/08/8-diy-bracelets-projects.html
Thanks for featuring them Miriam – what a lovely roundup! :)
I love what you make! it’s very beautiful!
kiss
Thanks Cathy :)
Hi Mama Miss – love your bracelets, so much fun for the kiddos! – updated my blog post to include your link. Thanks for visiting me! ~Karen
Thanks Karen :)
Thank you for creating and sharing your gorgeous washi tape craft! Your craft was featured on my site this morning as part of my 10 Easy and Awesome Washi Tape Crafts round-up.
http://stacymolter.com/2013/07/10-easy-and-awesome-washi-tape-crafts/
Enjoy your summer!
Stacy
awww thanks Stacy!!! what a special treat :) Loved your round-up! xx
I love this idea! I featured this today in my “What I Bookmarked this Week” post – stop by and see!
Thanks Danielle!! I’ll be sure to stop by :) xx
Good Day mama♥miss
Nice work above on the bracelets. Please take minute and see our new wood craft of
http:// http://www.Craft Stick Bending.com and http:// http://www.CraftStickCrafts.com. We are the first to have a web site all about bending popsicle sticks and making craft stick crafts. Thanks Brad
Thanks Brad!! :) xx
The look great! Quick question- do you think you could prevent the cracking by drilling holes in them first before soaking?
hmmm I don’t know Leslie – but you could always try! For me, it provided the slot to insert the string & it holds it pretty well so I was satisfied :)
I love this project! I love that you did it with your kids too! I would love it if you would come and link this up at my link party
Dandelion Wishes Wednesday. I’m also pinning this :)
Thanks Ashley!
Sooo cute Melissa! I’d love to feature these on The Washi Blog! Pop by if you’re interested! http://thewashiblog.com/submit-a-project/
Thanks Kimberly!!
I absolutely LOVE these, Melissa! I have to get some of this Washi tape! I’m seeing it all over Pinterest. I think this is one of the coolest things I’ve seen it used for yet.
Thanks Jackie!!!!
this is a great idea for mother-daughter bonding . :)
Thanks Rona! :) xx